Peak and hold injector driver board

A forum for discussing the MegaSquirt related (but non-B&G) board development, assembly, installation, and testing.

Moderators: jsmcortina, muythaibxr

Post Reply
racingmini_mtl
Super MS/Extra'er
Posts: 9127
Joined: Sun May 02, 2004 6:51 am
Location: Quebec, Canada
Contact:

Post by racingmini_mtl »

Jon k wrote:Sounds awesome Jean - I personally would prefer the slightly larger case because I have a 6 cyl... unless you could make a 6 cyl single board :)

Awesome keep me posted!
Even if the board fits the smaller box, the larger box is still a go. It will just mean that those who need 4 drivers or less will have the choice of fitting the board in the smaller or the larger box. Those who need 2 boards (5 to 8 drivers) will just have to use the larger case.

As I mentioned before, the second board will not have to be populated for the power supply but will just need to be connected to draw the power from the first board.

Jean
jbperf.com Main site . . . . . . . . . . . . . . . . . . . . . . jbperf.com Forum
Image
Jon k
Super MS/Extra'er
Posts: 1256
Joined: Fri Oct 14, 2005 10:28 am

Post by Jon k »

sounds absolutely awesome jean

man you've got me pysched. $350 i don't need to spend on some AEM device :)
1992 BMW 525i M50 Non Vanos 24v Turbocharged
Stock COP Wasted Spark
MS2/E v3
TYSON
MS/Extra Newbie
Posts: 1
Joined: Thu Jun 14, 2007 6:01 pm

Post by TYSON »

Very keen, will make using the microsquirt with injectors i need to run so much easier.
racingmini_mtl
Super MS/Extra'er
Posts: 9127
Joined: Sun May 02, 2004 6:51 am
Location: Quebec, Canada
Contact:

Post by racingmini_mtl »

I have received the boards. I will assemble one in the coming days and will do some trial fitting to both cases. However, I don't think it will be practical to use the small case because it will be a real pain to correctly secure the transistors to the case.

The larger case (which is still quite small) will make things much easier for the single board setup and still easy for the 2 board setup. However, there will be a need to use additional aluminum spacers similar to the V3.0 heatsink in the 2 board setup.

Jean
jbperf.com Main site . . . . . . . . . . . . . . . . . . . . . . jbperf.com Forum
Image
Jon k
Super MS/Extra'er
Posts: 1256
Joined: Fri Oct 14, 2005 10:28 am

Post by Jon k »

Sounds good jean - looking forward to it!
1992 BMW 525i M50 Non Vanos 24v Turbocharged
Stock COP Wasted Spark
MS2/E v3
racingmini_mtl
Super MS/Extra'er
Posts: 9127
Joined: Sun May 02, 2004 6:51 am
Location: Quebec, Canada
Contact:

Post by racingmini_mtl »

I have started the assembly of the board. I just need to do some drilling to mount the transistors to the case and get enough wire to complete the assembly.

I have also taken a few pictures to show what I have now and what the some connectors that could be used look size-wise compared to the case. I have also determined that the smaller case will not be an option even for a single board installation because mounting the transistors to the case for heat sinking will be almost impossible.

Here are pictures of the bare board and the partially assembled board (click on the picture for a larger version):
Image
Image

For more pictures go here.
jbperf.com Main site . . . . . . . . . . . . . . . . . . . . . . jbperf.com Forum
Image
Jon k
Super MS/Extra'er
Posts: 1256
Joined: Fri Oct 14, 2005 10:28 am

Post by Jon k »

Awesome jean!

I am interested in a dual board with the nice delphi connectors :)
1992 BMW 525i M50 Non Vanos 24v Turbocharged
Stock COP Wasted Spark
MS2/E v3
racingmini_mtl
Super MS/Extra'er
Posts: 9127
Joined: Sun May 02, 2004 6:51 am
Location: Quebec, Canada
Contact:

Post by racingmini_mtl »

I wanted to add that if I get enough interest, I could have a complete kit available that would be about the same price as the Digikey unit price. The board will be $20. I'll have to see what shipping will be.

The number of kits necessary for this would be around 20-25 depending on how many would be for 1 board and for 2 boards. I'd also need to know if people would be interested in connectors with the kit and which one(s). I don't plan on offering a wiring harness or pigtail but might consider it.

Jean
jbperf.com Main site . . . . . . . . . . . . . . . . . . . . . . jbperf.com Forum
Image
Jon k
Super MS/Extra'er
Posts: 1256
Joined: Fri Oct 14, 2005 10:28 am

Post by Jon k »

racingmini_mtl wrote:I wanted to add that if I get enough interest, I could have a complete kit available that would be about the same price as the Digikey unit price. The board will be $20. I'll have to see what shipping will be.

The number of kits necessary for this would be around 20-25 depending on how many would be for 1 board and for 2 boards. I'd also need to know if people would be interested in connectors with the kit and which one(s). I don't plan on offering a wiring harness or pigtail but might consider it.

Jean
Jean if you can't supply a kit can you supply a BOM for 2 units, including a case, and where to get the connectors I like those Delphi ones
1992 BMW 525i M50 Non Vanos 24v Turbocharged
Stock COP Wasted Spark
MS2/E v3
racingmini_mtl
Super MS/Extra'er
Posts: 9127
Joined: Sun May 02, 2004 6:51 am
Location: Quebec, Canada
Contact:

Post by racingmini_mtl »

Jon,

The BOM can be found here: . This is for a single board but for a dual board, you just double the components except those highlighted in green in the spreadsheet (watch for minimum order quantities).

The Delphi connector (GT150) is available at Mouser and the Tyco/AMP connector (Mate-N-Lok) is available at Digikey. The second and third sheets of the BOM show the part numbers for the connectors and all the needed associated parts (terminals, seals,...). Those were copied directly from my own orders so they contain all the needed parts for the connectors shown in the pictures but may not all be relevant depending on each setup and/or quantities may need updating for certain parts.

Jean
Last edited by racingmini_mtl on Sun Sep 07, 2008 5:53 pm, edited 1 time in total.
jbperf.com Main site . . . . . . . . . . . . . . . . . . . . . . jbperf.com Forum
Image
Jon k
Super MS/Extra'er
Posts: 1256
Joined: Fri Oct 14, 2005 10:28 am

Post by Jon k »

Jean how do the connectors interface to the case housing? Thanks for all the info!
1992 BMW 525i M50 Non Vanos 24v Turbocharged
Stock COP Wasted Spark
MS2/E v3
Jon k
Super MS/Extra'er
Posts: 1256
Joined: Fri Oct 14, 2005 10:28 am

Post by Jon k »

Jean sorry for double post but man a kit would be much easier - I couldn't find the case :(


Edit, nm found it
1992 BMW 525i M50 Non Vanos 24v Turbocharged
Stock COP Wasted Spark
MS2/E v3
racingmini_mtl
Super MS/Extra'er
Posts: 9127
Joined: Sun May 02, 2004 6:51 am
Location: Quebec, Canada
Contact:

Post by racingmini_mtl »

Look at JET's post from Dec 24. This is similar in that the connectors are outside and independent of the box. Wires are directly soldered to the board and go through the end plates through rubber grommets. They then go to one connector. The other connector has wires that go to the injectors, the ECU and the power take off.

Jean
jbperf.com Main site . . . . . . . . . . . . . . . . . . . . . . jbperf.com Forum
Image
Jon k
Super MS/Extra'er
Posts: 1256
Joined: Fri Oct 14, 2005 10:28 am

Post by Jon k »

racingmini_mtl wrote:Look at JET's post from Dec 24. This is similar in that the connectors are outside and independent of the box. Wires are directly soldered to the board and go through the end plates through rubber grommets. They then go to one connector. The other connector has wires that go to the injectors, the ECU and the power take off.

Jean
interesting I see - any pics of how to do the grommets? Would it be one large grommed with a bunch of wires? I don't want to tug on the board directly.
1992 BMW 525i M50 Non Vanos 24v Turbocharged
Stock COP Wasted Spark
MS2/E v3
racingmini_mtl
Super MS/Extra'er
Posts: 9127
Joined: Sun May 02, 2004 6:51 am
Location: Quebec, Canada
Contact:

Post by racingmini_mtl »

Jon k wrote:interesting I see - any pics of how to do the grommets? Would it be one large grommed with a bunch of wires? I don't want to tug on the board directly.
I don't have pics yet because that's pretty much the last thing in the assembly and I'm not there yet. It could be done in different ways but I was planning on using one or 2 grommets and have all the wires go through it (them). I was also planning on securing the wires such that tugging on them would not pull on the soldered connection and the board.

Jean
jbperf.com Main site . . . . . . . . . . . . . . . . . . . . . . jbperf.com Forum
Image
Jon k
Super MS/Extra'er
Posts: 1256
Joined: Fri Oct 14, 2005 10:28 am

Post by Jon k »

racingmini_mtl wrote:
Jon k wrote:interesting I see - any pics of how to do the grommets? Would it be one large grommed with a bunch of wires? I don't want to tug on the board directly.
I don't have pics yet because that's pretty much the last thing in the assembly and I'm not there yet. It could be done in different ways but I was planning on using one or 2 grommets and have all the wires go through it (them). I was also planning on securing the wires such that tugging on them would not pull on the soldered connection and the board.

Jean
Hrm I will have to look into it. So the parts in green, do we need those for one board, and only one order of those if we run two boards? But either way, we need those green parts 1x whether its 1 or 2 boards?
1992 BMW 525i M50 Non Vanos 24v Turbocharged
Stock COP Wasted Spark
MS2/E v3
racingmini_mtl
Super MS/Extra'er
Posts: 9127
Joined: Sun May 02, 2004 6:51 am
Location: Quebec, Canada
Contact:

Post by racingmini_mtl »

Jon k wrote:Hrm I will have to look into it. So the parts in green, do we need those for one board, and only one order of those if we run two boards? But either way, we need those green parts 1x whether its 1 or 2 boards?
Yes. The parts highlighted in green are for the power supply and you only need 1 power supply per case whether there is one board or two. So with 2 boards in a case, you have one board with all components and the second board with the components not highlighted in green.

The BOM has the total cost for the first board on top ($59.64) and the second board on the bottom ($39.57). So the total cost for all parts for 2 boards is the sum of those 2 ($99.21). It's actually slightly less because you don't need to order 10 R1. You then need to add the connectors and the wires.

Jean
jbperf.com Main site . . . . . . . . . . . . . . . . . . . . . . jbperf.com Forum
Image
JET
Helpful MS/Extra'er
Posts: 100
Joined: Tue May 04, 2004 7:02 am

Post by JET »

Looks great, anymore progress? cheers
racingmini_mtl
Super MS/Extra'er
Posts: 9127
Joined: Sun May 02, 2004 6:51 am
Location: Quebec, Canada
Contact:

Post by racingmini_mtl »

Here is an update:

I have completed the assembly of a 4 driver box except for the external connector but that will come soon. I will also do an 8 driver box as soon as I order the parts for it.

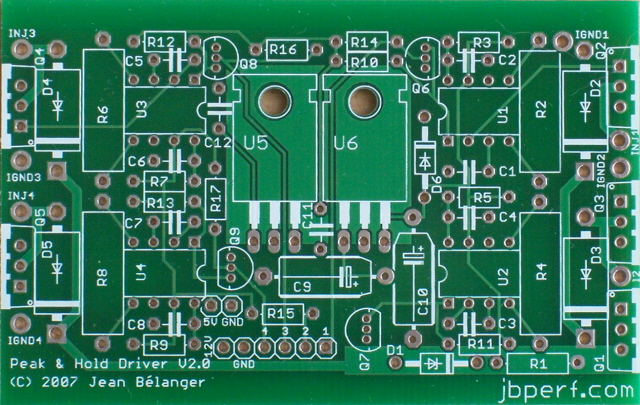
I have done the templates needed to correctly solder the transistors to the board and to drill the associated holes in the case. I have also done the templates for the needed heatsinks for the 2 board box. I have made 2 sets: one in imperial units and one in metric. The imperial are 1 3/4" long by 3/4" wide and can be either 1/16" or 1/8" thick. The metric are 47mm long by 20mm wide and can be either 2mm or 3mm thick. All holes are 1/8" (which is about 3.2mm). You need 2 pieces per board (so 4 for 2 boards). The templates are available as PDF files and need to be printed in 100% size. I have used the templates for my assembly. They are available here: http://jbperf.com/p&h_board/v2_0/Inject ... _board.pdf for the board template for the transistor assembly and http://jbperf.com/p&h_board/v2_0/Inject ... atsink.pdf for the drilling and heatsink templates.

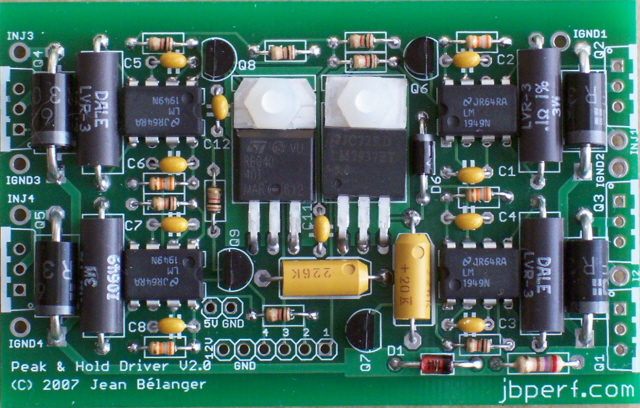
I have a couple of pictures. This is how the board template is used for the transistor assembly (click for a larger picture):
Image
The endplates are used under the transistors because they are the same thickness as the case bottom and you can also see that I have put the mica insulators for proper positioning. In the single board box, there is no need for additional heatsinks, the board is in the second slot, and the transistor leads are inserted in the board from the bottom. I have cut the end of the printed template to solder the transistor in the correct position.

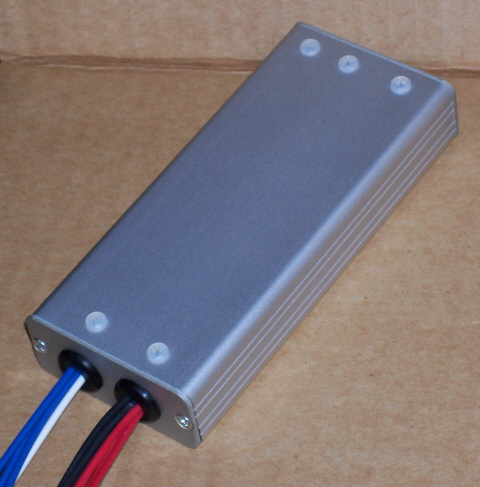
This is the assembled and closed box:
Image
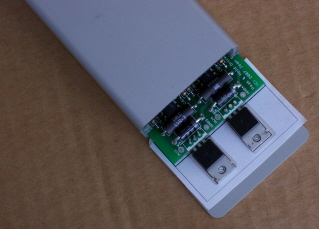
I have used nylon screws to attach the transistors to the case because that's what I had at hand but I recommend using metal hardware (which is what is in the BOM). You can also see that I have use 2 holes and grommets for the wires. On the left are the 4 injector control wires that go to the ECU (blue wires) with the 12V (white) and low current ground (black not visible in the picture). On the right are the 4 injector wires (red) and the 4 high current wires (black). The grommets are 1/4" rubber grommets which require 3/8" holes in the endplate. The wires are all 18 gauge TXL wires and the 6-wire bunch is just a tiny bit loose and the 8-wire bunch is a nice tight fit. All these wires will be connected to a single connector. And ideally I'd have different colors for each injector but that's what I have for now.

Jean
jbperf.com Main site . . . . . . . . . . . . . . . . . . . . . . jbperf.com Forum
Image
Poolside
Helpful MS/Extra'er
Posts: 85
Joined: Sun Aug 22, 2004 6:01 pm
Location: Long Beach CA

Post by Poolside »

Looks nice there, Jean. :thumbsup

- Jim
Post Reply